Monday, September 12, 2016

Mehndi Hands: A cultural lesson

Teaching where I teach in Antioch Tennessee, it seems like an unusual spot for a diverse community yet we have three translators on staff and multiple languages spoken throughout our school. I love our crazy mix of cultures at our school and it often inspires me to teach lessons that feature some of the cultures that we have in my art lessons.


There have been several occasions when I've had young girls come in with Henna/ Mehndi paint on their hands. Woman in several middle eastern cultures use Mehndi in celebration in honor of wedding ceremonies.
Image result for mehndi
Last year I discovered this fabulous children's story book called Nadia's Hands. The story itself about the girls feelings of going to school after having the Mehndi on her hands made her very scared to have it done to her. In the end, she was proud of it, and who she was, a young girl from Pakistan.


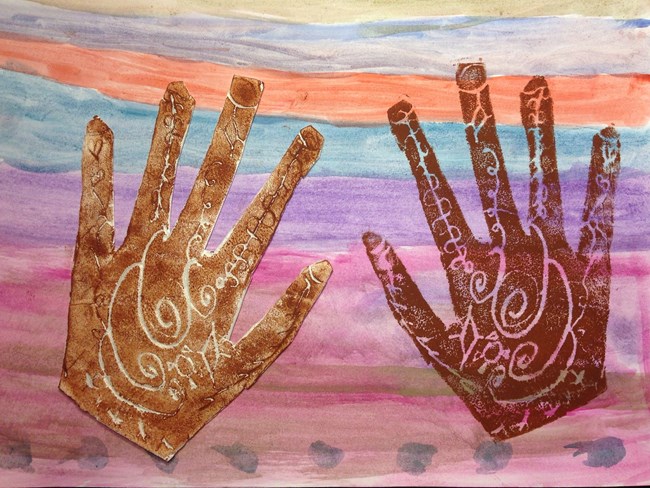
I chose to do this with fourth grade, and tied it in with printmaking. The students learned about how different symbols used in the Henna paint represent different things. 
 
¢Flowers: Joy and Happiness


¢Sun, Moon and Stars: Deep and everlasting love


¢Water: Human emotion


¢Vines/Leaves: Devotion


¢Diamonds: Enlightenment


¢Square: Stability

The students first painted their background of their papers using soft watered down tempera cakes. Then they were each given a Styrofoam plate which they traced their hand onto. Once their hand was traced, they designed their Mehndi on the hand using inspiration from the above listed symbols, zentangles, and other images that were meaningful to them. I even had a male student who drew a pokeball in the middle of the palm of his hand- it made it more personal to him! Then we used brown ink, and printed the hand on one side of the paper, and hot glued the Styrofoam to the other side so that the hands appeared to be a matching/ symmetrical pair.


***If I were to do this again, which I loved the lesson, however the results could have been better! I would try again using an actual printing foam purchased from a supplier rather than the plates from the dollar tree. These plates are great for printing- however the ink did not stick to the foam itself once it dried. The ink flaked off leaving the foam hand portion looking bare. Some worked better than others, I'm not sure if I had a few different brands of foam plates. I would highly recommend testing your materials before using them.
 Here are a few of the good ones!


Here's a few where the ink didn't stay as well...


Wednesday, September 7, 2016

Klimt Inspired!

Last summer, I took a long road trip to visit family and friends. One of the highlights of this trip was getting to see Gustav Klimt's Portrait of Adele. The movie "Woman in Gold" had come out that spring and if you haven't seen it, I recommend you check it out!


 The movie tells the story of how the painting was taken by the Nazi's in Germany and the family's fight to get the painting back. The painting now lives at the Neue Galerie in New York city, which I visited.

I was not able to take photos of the actual painting, but they had a replica downstairs that visitors were able to take photos with.


I was also really excited and inspired by this children's story about the history of the painting. The illustrations are absolutely beautiful and my students were completely mesmerized by the metallic colors. The book was nearly $30 but totally worth it! You can find the book here on the Neue Galerie website.


I read this story to my 3rd, 4th, and 1st grade students. My 3rd and 4th grade students did the same assignment, portraits that the backgrounds were then filled in with pattern and later painted using metallic tempera paints.


Finally my firsties looked at Klimt's painting "The Kiss" and we talked about patterns on quilts and blankets. I took their photos with my phone, printed them on the school's black and white copier, and had them cut them out, and create patterns on the blankets using markers and crayons. These were one of my favorite lessons last year! I hope you are inspired by Klimt as well!


Monday, August 29, 2016

Day one lesson: school wide mural

Last year for my day 1 lesson I read and did "the Dot." Each student created their own dot, and I had two marvelous parent volunteers that helped hang it for me. Here's a glimpse of what that looked like...

This year I decided to read "Only One You" by Linda Kranz. It's a great day one story and I love any book that encourages students to embrace what makes them unique. Here is the cover of the book. I think it's also worth the mention that Kranz also recently came out with another book similar to this one called "You Be You," which I haven't gotten a hold of yet, but I'm looking forward to it! 

Each student was given a half sheet with the outline of a Kranz fish on it that I actually found on her website here under the teacher tools link, there are all sorts of activities for the classroom that tie into her book! http://www.lindakranz.com/books_only-one-you.php 
Each student in grades K- 4 were asked to create their own patterns on their fish using markers, and color them in using crayons. I didn't give kindergarteners crayons on the first day, that's a lesson for day 2. The next time I saw my students, they were asked to cut out their fish, and given a sheet of construction paper and a tracer. I explained it as they were making a picture frame for their fish. Each grade was given a different color. 


Finally I had one class that I see more often than the rest, they were assigned to create painted paper on the butcher/ bulletin board paper that later became the water underneath. A few trips to the die-cut letters, and a little hot glue, my mural is finished and ready for open house! 


So many fish they wrapped around the corner! 


Saturday, August 27, 2016

Back to school... Classroom set up!

It's been a while, my apologies! I wanted to post a few things I have done different with my classroom this year so far, and the "day one" art lesson. 
First off, I am completely in love with and satisfied by my new set up this year! The first major change is that I covered my windows with butcher paper and used them to hang posters on rather than having them as Windows. My principal didn't seem super keen on the idea and I'm sure you're thinking, why would she want to do that? Well directly outside my classroom is the PLAYGROUND! Probably the biggest distraction that there could ever be adjacent to any classroom! After teaching in this room for 4 years, I decided this would be a major improvement and so far it is :)! Here is an in progress shot of the room. 


I also love that it naturally is giving me more wall/ bulletin board space. It's really helped allow me to spread out some of necessities that I needed to hang on the wall like the rules. Before I tried jamming them in around my front wall and it just was overwhelming. 

A new addition to the room that is pictured below is my crescent shaped/ guided reading table. This has already been amazing for demonstrating techniques to students! I do have a cheap version of an Elmo or document camera that I use in the room for drawing demonstrations, however when it comes to painting, especially color mixing the colors are off and the picture quality is extremely poor. Having this table has already changed the way I demo lessons and the kids seem to love it as well. Everyone fits pretty nicely around it, a few sitting and most standing, every view is a good view! If you have the space and the resources to add this to your room I highly recommend it! 

Another must for teaching elementary is a floor space where you can read to your students and introduce lessons, as well as have class discussions. I purchased this rug from "at home" which is kind of like a pier one on steroids, last summer for around $95 on sale. I'm able to use it again, however this year I took the additional step of duck taping all of the edges down. If you teach elementary kiddos then you know that no matter how many times you tell them not to run, inevitably someone runs across the floor anyway, and then the rug slides from under them, and there's a crash. I had seen another fabulous metro art teacher who had bought a rug and taped it down. I'm not sure why I didn't do this last year, but so far so good this year! The tape is one of the best decisions I made during my classroom set up for sure! (Tape is not pictured below, but I used a navy blue duct tape that matched the carpet.) 


One last addition I made to the room are the new and improved "no no board" and my beautiful oops board, aka what to do if you make a mistake. I used my little boho birds to explain what/ how you can improve your 'no no's' in your drawings. 
And of course we all have students that want a new paper immediately after making mistakes without even trying to erase what they've done, so I thought some sort of mistake board would make a bulletin board this year. 
Thanks for reading! I'll be back soon with day one lesson later! 


Tuesday, May 17, 2016

What's that smell? Essential Oils in the classroom!


Peppermint is amazing for focus, attention, energizing, and so much more! That is why this is the best essential oil for your classroom diffuser. Lavender is calming, however it isn't uncommon for people to be allergic to it, so I would shy away from other scents. Peppermint is pretty safe!

At the yoga studio, we use diluted oils to clean our yoga matts with, so why not my classroom tables?! Tea tree oil and lavender are mixed together to make a matt cleaner, however I'm sticking with peppermint! I have labeled a couple of spray bottles in my room with decorative duct tape, and diluted a few drops of peppermint oil in some water, and use these to spray the tables with. I pass out a piece of paper towel to each student and let them go to town wiping the tables clean. The students LOVE this! They love to clean and they love the smell! This is a fabulous chemical free way to clean and deodorize your classroom. This is also awesome when you run out of baby wipes! If you're like me, with one sink and 20+ kiddos there is never enough time to wash hands. Kill two birds with one stone. I go around spraying their hands and their tables with the special spray, then they can use their paper towel to clean their hands and then the tables.

Happy Spring Cleaning!

Saturday, April 11, 2015

Wicked Warhol's!

I am in love with this lesson. First graders last learned about how Georgia OKeeffe made the world look different at flowers by making them really big! Then they learned how Warhol looked differently at the world by making art from things that maybe weren't considered art and learned how to print make. Once the students made 4 prints of flowers, we created mixed media collages inspired by Warhol's flower images. I'm thrilled with the results and I think the kiddos really enjoyed it too! 

Teacher sample