Showing posts with label 2nd grade. Show all posts

Thursday, December 15, 2016

Holiday Shenanigans at School!

The teachers had a holiday door decorating contest: Here are some of my favorites...


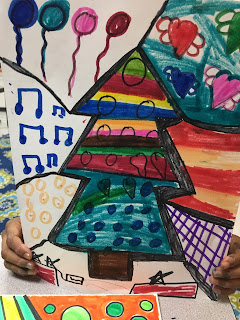
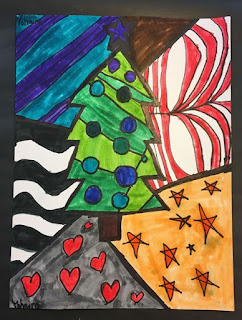
Meanwhile in the art room...Second graders are working on Romero Britto inspired Christmas Trees. This year I have absolutely fallen in love with his art and the positive message he sends to people, to spread love and happiness. Here is my new bag found on his website! Technically its a messenger bag, but for us art teachers, those are basically purses!

And some of the students work:


And my personal favorite!

 Most classes only had one class to work on these- but this guy's class had 2 days! Click the link to Cane Ridge Elementary's ARTSONIA page to examples of this lesson and so much more!
Happy Holidays!


Thursday, February 23, 2012

Happy Mardi Gras!

On our districts art curriculum pacing guide, 2nd graders are to create a mask. I tried to come up with something more original rather than just a typical African mask because masks are used in many different cultures. On tradition celebrated right here in the states: Mardi Gras! I found a fabulous power point online that was informational about the traditions of Mardi Gras- and all was appropriate for elementary discussion :) Rex is the king, the colors of Mardi Gras are purple, green, and gold, the colors all are symbolic, parade traditions, krewes', king cake, and of course masks! The students LOVED this presentation and were really into the information. I mean what kid wouldn't get excited about parades, masks, and cake!? I even found the 'doubloons' that are the coins that Rex throws from the parade floats at the dollar store and gave each of my students one.

So about the masks! The masks are made from "sculpt a mold" a paper mache material that all major art catalogs carry, and we used plastic mask molds. I was at first worried about the sculpt a mold sticking to the inside of the plastic mask, because this material does adhere itself easily to other things, but they popped right out. I let the students paint them with tempera and acrylic paints, only green, gold, and purple. Finally students got the opportunity to embellish their masks using sequins and feathers, as many of the masks for mardi gras are decorated in feathers!!!! Enjoy the results, and as always check out artsonia for more examples!


Thursday, December 15, 2011

Lots of Landscapes!

This past month or so we have been focusing on landscapes, in several different grades. Below are some examples of a few of the landscapes we have been working on...

1st grade Glue Resist oil pastel landscapes on black construction paper


2nd grade: Torn paper Landscapes using construction paper, magazine clippings, and mod podge!


1st grade: Torn construction paper winter landscapes


Friday, November 18, 2011

El dia De los Muertos

 About 50% of my schools student population is hispanic, so this year I wanted to teach my students about the day of the dead! Second graders drew and painted a full figured skeleton or calaca, and completed them using oil pastels, sequins, and tissue paper. The third grade curriculum required for them to create a mask, so we made sugar skull paintings, again completed with oil pastels, sequins, and tissue paper. The results were pretty fabulous! Finally I had my fourth graders test their cutting skills while creating papel picado, cut paper banners. Unforunately I only could find one pattern for the papel picado lesson online. If you are reading this and know of other online reasources that provide more free templates please let me know, thanks! Enjoy :)


Wednesday, November 2, 2011

Still Wild about Warhol!

Probably the last Warhol project for a while, second grade completed an assignment similar to one I did at the Frist this summer. I had the students cut out their own flowers out of tissue paper, and I helped them with squirting water on them to make a print from the bleeding tissue. The next class the students used a sharpie to outline and draw details on the flowers. Finally we used a green and a black oil pastel to create the grass around the flowers, similar to that in Warhol's flowers. Below is one of the many examples I showed the students, and the rest are the students work. Of course you can find more in our artsonia gallery!


Tuesday, March 15, 2011

Eric Carle Paintings AND Collages!

So in honor of the great Eric Carle and his wonderful children's illustrations, I introduced his art making process to the 1st and 2nd grade students through the movie "Picture Writer." The 1st graders just completed an assignment where we made drawings of planets, so it made since to connect them with the book "Draw me a Star." I also was inspired by Deep Space Sparkle's Carle butterflies. Check out what they have been up too!


We started off painting papers just like Carle would, only rather than working with tissue paper we used drawing paper.


Students collaged butterflies on drawing paper, then cut and pasted those butterflies onto a piece of colored construction paper. 


Those working on star collages, first used oil pastels for the background, then cut out their stars.


Monday, February 21, 2011

2nd Grade Shading


It is truly amazing what 2nd graders are capable of!


In teaching my students value, we are kinda working backwards, or maybe it is in the right order, I'm not sure. My second graders I taught them what tints and shades were, and we made three of each. Now I recently placed a softball in front of them and attempted to teach them about value and shading in it's practical application- rather than in a design. I was really amazed with some of their little pencil drawings.


Of course not all of my students works turned out this fabulous. See all of them in our artsonia gallery!

Sunday, January 30, 2011

Magical Worry Dolls

There is nothing more adorable then a lesson that the students really get into and uber excited about! In this case my first graders experienced the legend of Guatemalan worry dolls! I created this lesson when I was a student teacher, working at a small jewelry store on the beach in RI, where I sold pottery, handbags, wind chimes, and assorted trinkets, including Worry Dolls. I loved the concept of worry dolls and thought that it was really a fantastic lesson to teach to the students. In case you are wondering what they are, here fabulous link to explore http://worrydepository.com/legend.html . Also here is the little story that comes with each set of dolls:

WORRY DOLL LEGEND - There is a legend amongst the Highland Indian villages of Guatemala: If you have a problem, then share it with a worry doll. Before going to bed, tell one worry to each doll, then place them beneath your pillow. Whilst you sleep, the dolls will take your worries away!


At the time I felt that the best way to convey the concept of the worry dolls to the students was through a story book, well I couldn't find one that did that. I wrote a book to go with the lesson and got a friend of mine at the time to illustrate it for me. The students really got a big kick out of this too! They couldn't believe that I wrote a book just for them!

Anyway, here is the rest of the lesson. Students twist pipe cleaners together to form their doll. Rather than wrapping the structure in embroidery floss like the actual dolls, I have the students continue to use pipe cleaners to create clothing on their doll. Pipe cleaners are fairly cheap and easy for students to manipulate. Finally, I pre-made a pouch for the students worry dolls to "sleep" in. I take cut construction paper to be 6 x 12 " and fold it over leaving about an 1- 1.5 at the top. Then I punch holes all around the edge, and put a staple on each side to hold it together for the students. They have to sew yarn around the edges and decorate the pouch creating a pattern- and we talk about what a pattern is. The pouch is for the doll to sleep in, but also for you the teacher to keep track of who's doll is who's. I originally did this with 2nd graders. When I did I have created a worksheet to go along with it to have the students write about their doll, giving it a name, describe what the doll was wearing, and what they're dolls magical powers are. We even had a show and tell portion of the lesson where the students introduced their doll to the class. It was very adorable!
 This doll has a sword! 
 This guy here is skateboarding!        


I recently discovered that there are kits that provide you with materials to make worry dolls as well. Enasco has a kit http://www.enasco.com/product/9720639HV. Also Amazon has a kit that supposedly allows for you to make 100 dolls! Here is the link for that! http://www.amazon.com/Worry-Dolls-Craft-Kit-Makes/dp/B000VLA15M Here is my 2 cents on the kits: I think that these materials may not be appropriate for the level of 1st and 2nd grade students. I personally think that these younger students may not have the patience or the motor skills to work with embroidery floss! But the pipe cleaners are fantastic!  

 Visit the link above to see more worry dolls and MANY more lessons on my Artsonia page! Thanks for looking!