
Showing posts with label 3rd grade. Show all posts
Showing posts with label 3rd grade. Show all posts
Wednesday, February 15, 2012
3rd grade zentangle landscapes
So lately I've gotten my third graders hooked on zentangling! First with the paper sculptures, which I previously posted about, and now I'm having them zentangle a landscape drawing using fine and ultra fine sharpie markers. Below is a sample that I worked on with my students yesterday. I'll post theirs when they are done, but so far so zen!
Thursday, January 19, 2012
Frank Stella Inspired 3-d Paper Sculptures
One of the third quarter curriculum requirements for 3rd grade is sculpture. I choose to have the students complete a paper sculpture inspired by great American artist Frank Stella. I also combined the lesson with Zentangle drawing. First I had the students draw organic shapes, and fill those organic shapes with zentangle patterns before cutting out the pieces. Once the pieces are cut, I have the students use a hot glue gun to glue down the pieces while twisting, bending, and folding them finally adhering them to a piece of matt board. I was fortunate to have a TON of matt board donated to me a few years back... Also the paper that I had the students use is cardstock, not just regular paper. Here is the link to the orignal lesson that I found. http://www.princetonol.com/groups/iad/lessons/elem/Julie-design.htm
Here are a few of the results. Of course there are more examples on my artsonia link!


Here are a few of the results. Of course there are more examples on my artsonia link!


Wednesday, December 14, 2011
A new SPIN on Circle Weaving!
I saw this on pinterest recently and I had to try it with my third graders. What I like about using the CD for circle weaving is that it is smaller than the paper plates taking less time, the students are even more excited about it because it is a CD, and the are neat looking when they are finished. The cons... the CD's do not offer a slit for the warp to rest in so the strings slide around making it more difficult to weave on then the plate. I then sent home the finished products with the students so that they could turn them into ornaments for their Christmas trees :)


Friday, November 18, 2011
El dia De los Muertos
About 50% of my schools student population is hispanic, so this year I wanted to teach my students about the day of the dead! Second graders drew and painted a full figured skeleton or calaca, and completed them using oil pastels, sequins, and tissue paper. The third grade curriculum required for them to create a mask, so we made sugar skull paintings, again completed with oil pastels, sequins, and tissue paper. The results were pretty fabulous! Finally I had my fourth graders test their cutting skills while creating papel picado, cut paper banners. Unforunately I only could find one pattern for the papel picado lesson online. If you are reading this and know of other online reasources that provide more free templates please let me know, thanks! Enjoy :)


Wednesday, June 22, 2011
Color Wheels on a budget
I know that many art rooms, like my own, are on a very tight strict budget. I will have enough liquid tempera paint to have a class or two complete one painting, but not enough for them to also mix a color wheel. One of the greatest materials that I use in my classroom, are not only convenient to distribute to the students' tables, but is reasonably priced, and will last you the entire year! Tempera Cakes! I love tempera cakes- they are used similarly to watercolors but have a greater concentration of color. The downside of tempera cakes is that often times students will paint right through the paper, so warn your students about painting over the same spot on their paper over and over again!
For this assignment I had the students cut a small shape out of a piece of oak tag/ index card and trace it 12 times on their drawing paper in the shape of a wheel. They do have to paint their wheels in correct color order, but if they do make mistakes they are able to re-draw the shapes on their paper before cutting out their wheels. Once they complete their paintings, I had them cut out their shapes and paste them onto piece of black construction paper to eliminate stray marks and create a clean complete look! This lesson was also from Ms. Peggy Flores and was demonstrated in one of her Crystal videos on color.


For this assignment I had the students cut a small shape out of a piece of oak tag/ index card and trace it 12 times on their drawing paper in the shape of a wheel. They do have to paint their wheels in correct color order, but if they do make mistakes they are able to re-draw the shapes on their paper before cutting out their wheels. Once they complete their paintings, I had them cut out their shapes and paste them onto piece of black construction paper to eliminate stray marks and create a clean complete look! This lesson was also from Ms. Peggy Flores and was demonstrated in one of her Crystal videos on color.


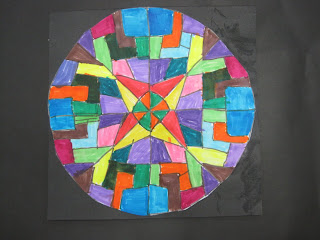
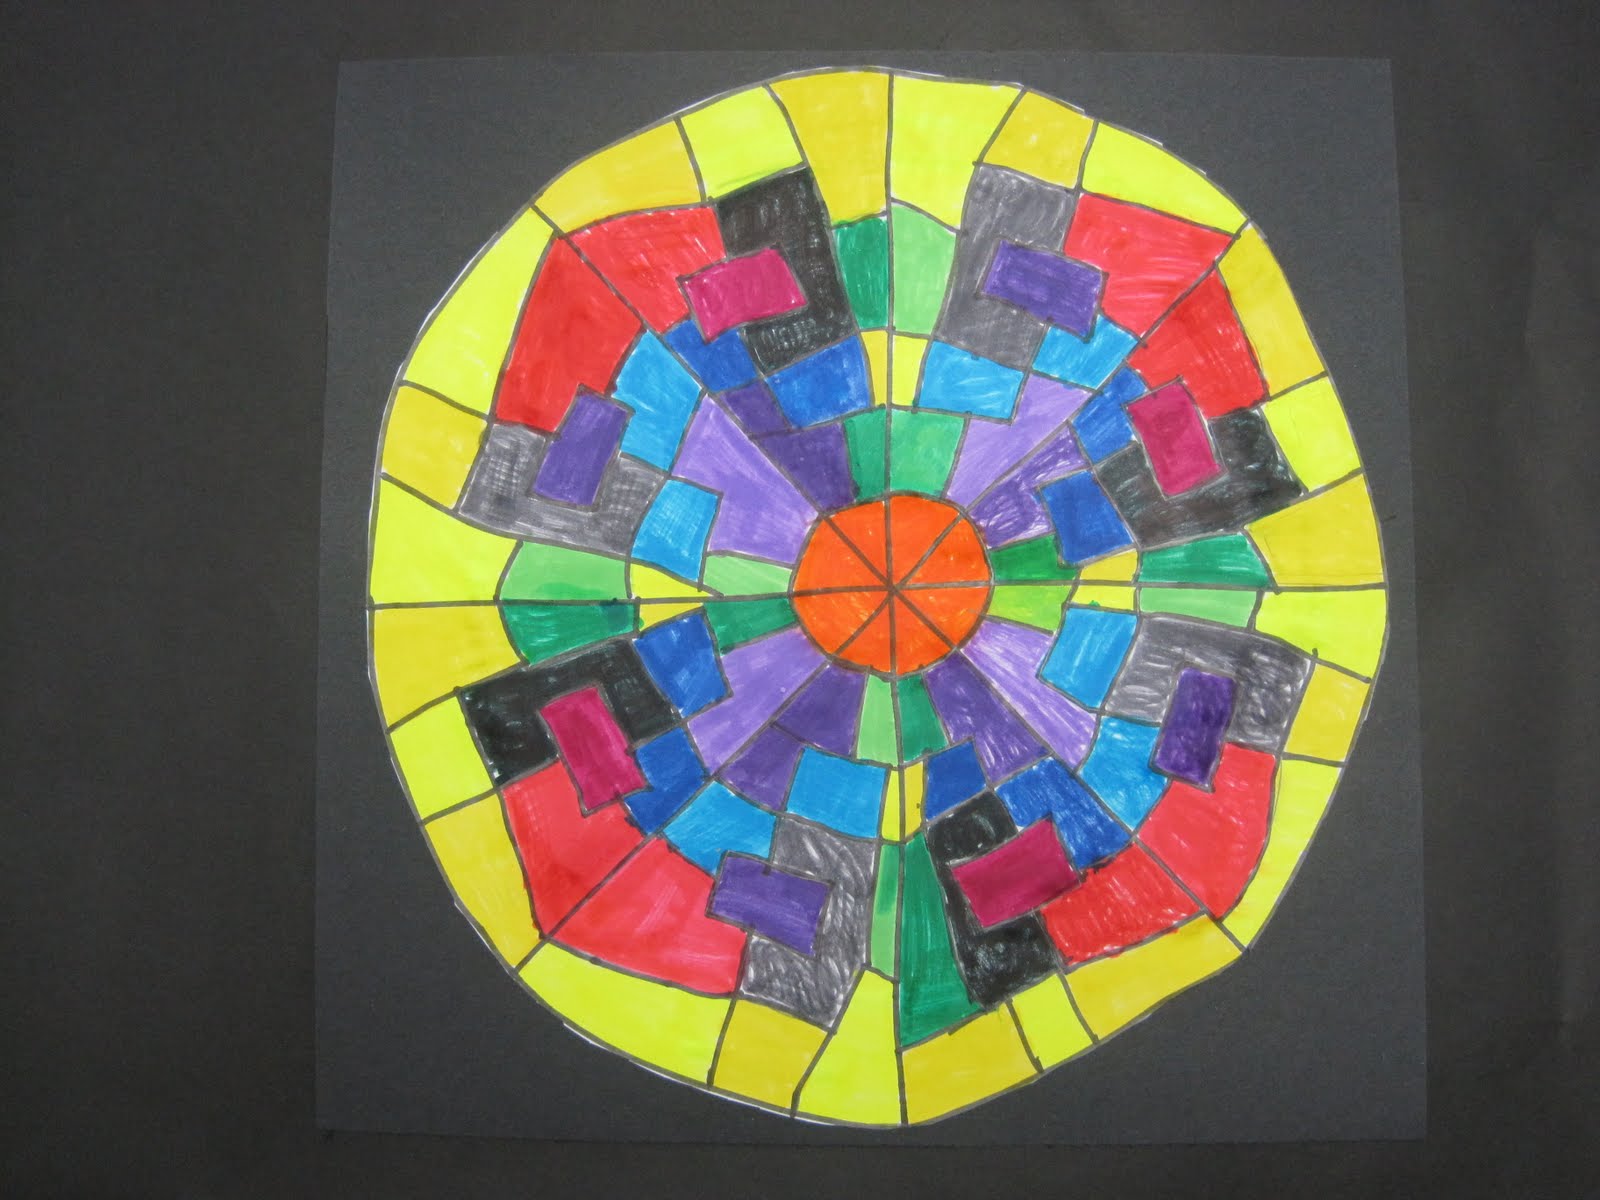
Kaleidoscopes
Towards the end of the year, while some students are still wrapping up some projects from the end of the semester, others were begging for something more to do. During one of the Tennessee Arts Academy session last year I learned so much from Ms. Peggy Flores. If that name sounds familiar, it is because Peggy has filmed many art instructional videos for Crystal Productions- hands down she is absolutely fabulous! My students really enjoyed her video on color/ the color wheel. One of the projects though that I did with my 3rd and 4th grade students was her Kaleidoscope lesson. These following examples were done using a template that she gave us which I will post photos of on here at a later date...


Wednesday, January 19, 2011
3rd Grade Circle Weavings
This was the first time I tried this, and after a bit of consulting with friends and different approaches! Part of the Metro art curriculum is a circle weaving. Mr. E. uses cardboard circles- aka pizza rounds for his third graders, and I would have too if I had any money. Mrs. Jahnig uses paper plates, which is what I did. Dollar Tree is a fabulous place for art supplies!!!! I used the paper plates, but simply doubled them up to make them a little more sturdy. Like Mrs. Jahnig, I had my students complete their projects with a design around the border using markers. Thanks guys!!!


Monday, December 27, 2010
3rd Grade Torn Paper Landscapes
The third graders did an excellent job with learning about landscapes. The students learned the parts of a landscape- foreground, middleground, background, and sky- and used torn paper to illustrate the different parts. The details were then added using oil pastels. Check our the results. More can be found on our artsonia page.


Wednesday, October 13, 2010
3rd and 4th Grade Self Portraits
The first several weeks of school I spent teaching the 3rd and 4th graders how to measure proportions of their facial features in order to create a self portrait. It was a hard lesson for both myself and the students when once we were through with the drawing, the painting of the portraits was rushed and completely covered the drawings. The fourth graders used a monochromatic color scheme with using the complementary color for the background, and the third graders used primary colors- working with tempra cakes. Third grade was also encouraged to keep the colors seperate. Below are a few really great examples.


Subscribe to:
Posts (Atom)